Introduction to Chicken Tikka
Chicken tikka is an iconic dish that has garnered immense popularity worldwide, particularly in South Asian cuisine. This dish consists of marinated chicken pieces that are grilled or roasted, often served as an appetizer or part of a main meal. The origins of chicken tikka can be traced back to the Indian subcontinent, where it is traditionally made using yogurt-based marinades infused with a variety of spices such as cumin, coriander, and garam masala. This not only imparts flavor but also ensures the chicken remains tender and juicy during the cooking process.
The method of preparation typically involves cutting chicken into bite-sized chunks, marinating it for several hours, and then skewering the pieces before cooking them over an open flame or in a tandoor oven. As a result, chicken tikka often develops a smoky flavor and charred exterior that further enhances its appeal. Its vibrant colors and aromatic spices make chicken tikka a delightful feast for both the eyes and the palate.
In recent years, chicken tikka has transcended its traditional origins and has found favor in various parts of the world, becoming a staple in Indian restaurants and even a cherished option in international cuisine. Food lovers appreciate the versatility of this dish, as it can be served in multiple forms—whether enjoyed on its own, served with an array of chutneys, or incorporated into wraps and curries. From casual gatherings to formal occasions, chicken tikka has established itself as a favorite among food enthusiasts looking for a burst of flavor and warmth.
This beloved dish not only symbolizes the rich culinary heritage of India but also serves as an opportunity for individuals to come together and enjoy a shared experience filled with delicious flavors. With myriad possibilities in its preparation, chicken tikka invites both novice cooks and experienced chefs to explore their creativity in the kitchen, making it an exciting dish for any food lover.
Ingredients for Chicken Tikka
To prepare a delectable chicken tikka, various ingredients are essential to ensure a delightful blend of flavors. Start with the primary ingredient, chicken, and opt for boneless chicken thighs or breasts, totaling around 500 grams, as they tend to be juicier and more flavorful. It’s crucial to cut the chicken into evenly sized pieces for consistent cooking.
The marinade is a pivotal component that imparts the signature taste to the chicken tikka. Begin with natural yogurt, roughly 200 grams, which will help tenderize the meat and ensure it absorbs the spices effectively. Spices are paramount – include 1 tablespoon of garam masala, 1 teaspoon of cumin powder, 1 tablespoon of coriander powder, and a pinch of turmeric for an earthy color. Adding two teaspoons of red chili powder will introduce the desired heat to your dish, while salt, to taste, balances the flavors.
For aroma and taste enhancement, incorporate minced garlic and ginger, about 1 tablespoon each, along with the juice of one lemon to inject acidity and brightness into the marinade. It is advisable to combine these ingredients and allow the chicken to marinate for at least an hour, preferably overnight in the refrigerator.
Additionally, serve the chicken tikka with a refreshing raita and onion salad. For the raita, gather 200 grams of plain yogurt, finely chopped cucumber, mint leaves, and cumin powder. For the onion salad, slice one large onion thinly, and combine it with lemon juice, salt, and chopped fresh coriander. These toppings complement the chicken tikka perfectly and enhance the overall dining experience.
Preparing the Chicken Marinade
One of the most critical steps in achieving the authentic taste of chicken tikka lies in preparing a flavorful marinade. The marinade not only tenderizes the chicken but infuses it with the aromatic spices that are quintessential to this dish. To begin, gather your ingredients: boneless chicken pieces, yogurt, lemon juice, and a medley of spices including cumin, coriander, garam masala, turmeric, and chili powder.
Start by placing the chicken pieces in a mixing bowl. The use of boneless chicken is recommended for consistent marination and cooking. Add a generous amount of plain yogurt, which acts as a base, providing creaminess and tang. The yogurt’s acidity helps to break down the chicken fibers, making it tender and juicy. Following this, squeeze fresh lemon juice over the chicken, which will further enhance the flavor profile while also contributing to the marinating process.
Next, it’s time to incorporate the spices. Use ground cumin and coriander for their earthy notes, and add garam masala for that aromatic kick unique to Indian cuisine. A touch of turmeric will not only add color but offers a subtle, warm flavor. For those who enjoy heat, include chili powder according to your taste preference. This combination of spices is crucial, as it permeates the chicken, creating a robust infusion of flavors.
Once all ingredients are combined, ensure the chicken pieces are thoroughly coated. It is advisable to let the chicken marinate for a minimum of one hour, although leaving it overnight will yield the best results. This extended marination allows the flavors to meld together beautifully and ensures that the chicken absorbs every bit of spice goodness. With patience, the next step of cooking the chicken will be nothing short of a delightful experience.
Cooking the Chicken Tikka
To create a truly delectable chicken tikka, selecting the right cooking method plays a crucial role in achieving the desired texture and flavor. The two most popular methods for cooking chicken tikka are grilling and baking, both of which can yield delicious results when executed correctly.
For grilling, it is ideal to use a charcoal or gas grill. Preheat the grill to a high temperature, which allows for a smoky flavor that is characteristic of authentic chicken tikka. Skewered marinated chicken pieces should be placed on the grill, ensuring they are spaced adequately to facilitate even cooking. Grill the chicken for about 10-15 minutes, turning occasionally, until the internal temperature reaches 165°F (74°C), ensuring both doneness and juiciness. Coating the chicken in oil or marinade prior to grilling helps enhance the grilling process, resulting in a beautiful char and depth of flavor.
Alternatively, baking is an excellent option for those without outdoor grilling facilities. Preheat your oven to 425°F (220°C) and place the marinated chicken on a baking tray lined with parchment paper. Bake for 15-20 minutes, flipping the chicken halfway through to promote even cooking. To replicate the smoky taste of grilled chicken, consider using a broiler for a couple of minutes at the end of cooking time. This step can create the pleasing exterior crisp that is often sought in chicken tikka.
No matter the cooking method selected, using a meat thermometer is advised to confirm the chicken is cooked thoroughly. Always let the chicken rest for a few minutes after cooking, allowing juices to redistribute, ensuring each piece remains moist and flavorful. These steps will empower you to craft a chicken tikka that not only tantalizes the palate but embodies the authentic flavors of this celebrated dish.
Making Raita to Accompany Chicken Tikka
Raita is a traditional Indian condiment, typically made from yogurt, and serves as an ideal side dish to complement the spicy notes of chicken tikka. Not only does it provide a refreshing contrast to the bold flavors of the marinated chicken, but it also serves to balance the heat from the spices. Below, we outline the ingredients necessary for a basic raita recipe and provide a step-by-step preparation guide, along with suggestions for personalized variations.
The core ingredients of raita include:
- 1 cup plain yogurt
- 1 small cucumber, grated or finely diced
- 1 small onion, finely chopped (optional)
- 1 teaspoon roasted cumin powder
- Salt to taste
- Fresh coriander or mint leaves for garnish
To prepare the raita, begin by placing the plain yogurt in a mixing bowl. Whisk the yogurt until it becomes smooth and creamy. This step ensures that the yogurt has a light texture, making it easier to mix with the other ingredients. Next, fold in the grated cucumber and chopped onion, if using. The cucumber adds a refreshing crunch, while the onion offers a mild, savory depth to the dish.
Season the mixture with roasted cumin powder and adjust the salt according to your taste preferences. The roasted cumin adds an earthy flavor that enhances the overall character of the raita. Once all ingredients are well combined, you can garnish your raita with freshly chopped coriander or mint leaves, adding a vibrant color and aroma.
For those looking to experiment, variations of raita can be incorporated easily. Some might prefer adding diced tomatoes for extra freshness or finely chopped green chilies for a spicy kick. Alternatively, fruit-based variations, such as adding diced pineapple or pomegranate seeds, can create a delightful twist. The versatility of raita allows for numerous adaptations based on personal taste and preferences.
Preparing Simple Onion Salad
Onion salad is a refreshing and easy-to-make accompaniment that complements the rich flavors of chicken tikka. Its straightforward ingredients and preparation offer a delightful way to enhance the overall meal experience. To make a simple onion salad, you will need the following ingredients: fresh onions, tomatoes, cucumber, lemon juice, fresh coriander, green chilies, and salt. These ingredients not only contribute to the flavor but also add a vibrant color to your plate.
Begin by selecting fresh, crisp onions, as they will be the star of your salad. Red onions or white onions both work well, though red onions are often preferred for their milder taste and appealing color. Start by peeling and slicing the onions thinly. If you wish to soften the taste of the onions, you can soak them in cold water for about 10 minutes before draining. This helps to mellow their sharpness and adds to the overall enjoyment of the dish.
Next, prepare the other vegetables. Dice the tomatoes and cucumber into small pieces, ensuring that they are similar in size to the diced onions for even distribution. Chop the fresh coriander leaves finely, and slice the green chilies to your preferred level of spiciness. Once all the ingredients are prepared, combine them in a mixing bowl.
For dressing the salad, you can squeeze fresh lemon juice over the mixture and sprinkle some salt to taste. Toss the ingredients gently to combine, allowing the flavors to meld together. The fresh acidity of the lemon juice not only enhances the taste of the raw vegetables but also cuts through the richness of the chicken tikka, providing a balanced meal.
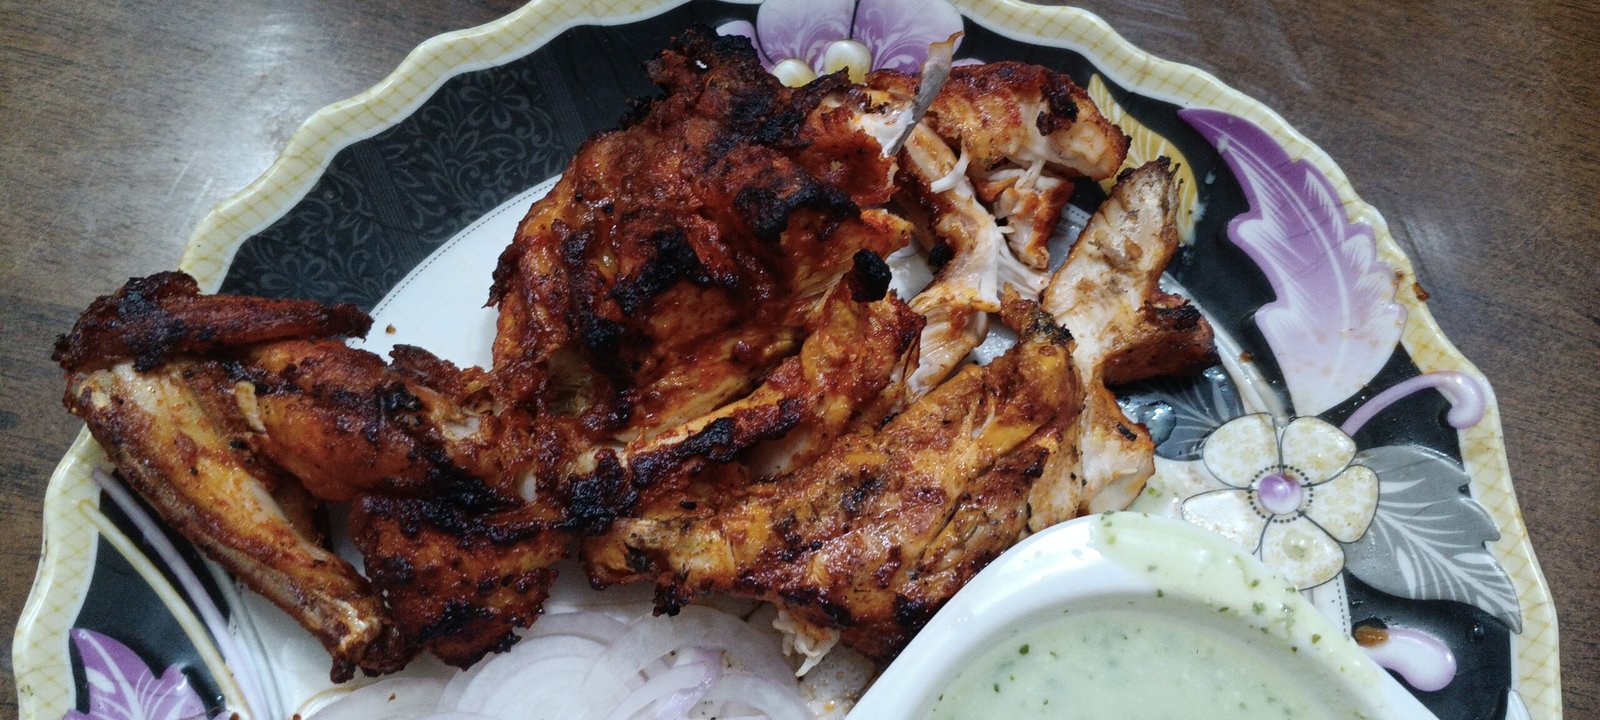
Plating the Dish: Presentation Tips
Effective presentation of chicken tikka can significantly enhance the dining experience, transforming an already tantalizing dish into a feast for the eyes. To achieve this, consider the principles of color, composition, and garnish. Begin with a clean, attractive plate that complements the vibrant hues of the chicken tikka. White plates are often favored, as they provide a stark contrast to the deep orange and red colors of the spiced chicken, making the dish visually pop.
When arranging chicken tikka on the plate, strategic placement is essential. Position the pieces of chicken tikka artistically rather than stacking them. A slight overlap or a fan shape can add elegance to the presentation. Additionally, include a portion of raita, a yogurt-based side that complements the spices of the tikka. Consider serving the raita in a small bowl or ramekin, placing it on the side, ensuring that the viewer’s eye is drawn to both the chicken and the cooling dip.
Onion salad, often served alongside chicken tikka, can also provide vibrant colors and textures. Use thinly sliced red onions mixed with a sprinkle of fresh coriander and a dash of lemon juice to create a refreshing contrast to the warm, spiced chicken. The use of fresh herbs not only lends flavor but also aesthetics, enhancing the overall appeal. For an impressive touch, consider edible flowers or microgreens as a garnish, which can elevate your dish, making it suitable for photography.
When it comes to food photography, natural light is your ally. Arrange the dish in a well-lit area, framing it in a manner that highlights its textures and colors. A simple matte background can minimize distractions while allowing the vibrant dish to remain the focal point. Remember to take multiple angles; sometimes the best shot occurs from an overhead view, showcasing all components harmoniously.
Photography Tips for Food Lovers
Capturing the essence of your chicken tikka dish is essential for sharing your culinary adventures. The right photography techniques can elevate your food presentation, making your dish irresistible to viewers. Here are some insightful tips to help you showcase your chicken tikka in the best light.
First and foremost, lighting plays a critical role in food photography. Natural light is often the best option, as it enhances the colors and textures of your dish. Position your chicken tikka near a window during the day to take advantage of this natural illumination. Avoid harsh overhead lighting, as it can create unflattering shadows and alter the true appearance of your food.
Next, consider your angles. The angle from which you shoot can significantly impact the viewer’s perception of the dish. For chicken tikka, an overhead shot (top-down view) works well to capture multiple plates in one frame, showcasing the vibrant colors and ingredients. Alternatively, a slight side angle can emphasize the layers and textures of the chicken, making it more visually appealing.
Composition is another essential aspect to consider. Arrange your chicken tikka attractively on the plate, using garnishes such as fresh herbs or lemon wedges to enhance the overall look. Utilize the rule of thirds by imagining your frame divided into nine equal parts and placing your focal point at one of the intersections. This technique often creates a more balanced and dynamic photograph.
Lastly, don’t forget to experiment. Try different backgrounds and props to create contrast and texture. A rustic wooden table or a clean white plate can change the feel of your photo. Take multiple shots and adjust settings as necessary to find the perfect match for your delicious chicken tikka dish.
Final Thoughts and Enjoying the Meal
Cooking is more than just a means to an end; it is a joyful experience that can bring people together. As you embark on creating this delicious chicken tikka recipe, allow yourself to fully engage in the process. The aroma of marinated chicken grilling to perfection is guaranteed to evoke anticipation and excitement. This dish is not only a delight for the taste buds but also a perfect opportunity to bond with family and friends.
As you prepare your chicken tikka, remember that the beauty of cooking lies in its flexibility. Feel free to adjust spices and ingredients according to your personal preferences. Whether you prefer a milder flavor or an extra kick of heat, this recipe serves as a wonderful base to explore your creativity in the kitchen. Consider experimenting with different marinades or adding seasonal vegetables to complement the grilled chicken. Your taste is your guide, and customization can turn this dish into a unique culinary creation that reflects your palate.
Once your chicken tikka is ready, gather your loved ones around the table. Serving this vibrant dish creates a perfect setting for shared laughter and conversations. Accompany the chicken tikka with freshly made naan or a refreshing salad to balance the rich flavors. The experience of dining together is enhanced by the delightful tastes and aromas, making every meal an event to remember.
Ultimately, the joy of preparing and enjoying chicken tikka lies in the connections it fosters. When you share your culinary efforts with others, you create lasting memories. So, take this recipe as an invitation to savor not just the food, but also the moments shared with those who matter most. Happy cooking and bon appétit!
If you enjoyed exploring this recipe, you might also like our Fresh Produce stories — such as Watermelons in Crates , which celebrates summer traditions, or Red Carrots in Crates , highlighting cultural recipes and nutrition. For comfort food lovers, don’t miss Frozen French Fries , a look at how frozen staples power kitchens worldwide.

Founder of What Buy & Author of “Diplomacy on the Edge.” Durrani writes about education, creativity, and digital entrepreneurship. His mission: helping students learn smarter and earn better.
Follow me on:
Facebook |